Projects
In "Projects" menu, you will be able to manage:
- Projects that belong to your organization.
- Applications in each project
- Scan results for each application.
2.1 Projects
List of projects which belong to an organization can be found below the organization details when Projects menu is clicked.
 Organization Details and Project Listing
2.1.1 Create a New Project
In order to create a new project, click "Create" in the Projects menu.
The form to enter information for the new project will be displayed as shown below.
 Create New Project Form
 Create New Project Form Filled with Details
The new project will be successfully created and project listing will be refreshed as follow.
 Updated Project Listing
2.1.2 View Project Details
The details of a project can be viewed by clicking on that project from project listing as shown in the figure below.
The details such as project created date and, the list of applications in the project, severity status of vulnerabilities found in the applications will be displayed.
 Project Details and Application Listing
2.2 Edit Project
To modify the project details such as name, description, logo and manager, click "Update" as shown below.
 Edit Project Button under Project Details
The current details of the project will be displayed. Enter the changes to be made accordingly and click "Submit" to save the changes.
 Changes Entered for Project Details
The changes will be saved successfully and reflected on the page.
2.3 Delete Project
You may also delete any existing projects from project listing by clicking "Delete" button.

Confirmation Message for Deletion
Additional confirmation to delete the project will be displayed as shown below. Enter "DELETE" and click "Delete" to confirm. Otherwise, click "Cancel".
 Additional Confirmation Message for Deletion
Upon confirmation, the project will be successfully deleted and project listing will be refreshed.
2.4 Applications
The list of the applications which belong to a project can be found below the project details when the project from the project listing is clicked.
Application Listing under Project Details
2.4.1 Create a New Application
In order to create a new application, click "Create". A form to enter information for the new application will be displayed as shown below.
Enter all the required information, upload a logo and click "Submit" button.
 Create New Application Form Filled with Details
The new application will be successfully created and application listing will be refreshed as follows.

Updated Application Listing
2.4.2 View Application Details
The details of an application can be viewed by clicking on the application from List of Applications.
 Application Name to be Clicked to View Details
The details such as application created date, host type, OS information, URL, platform, severity status of vulnerabilities found in the application, open and closed vulnerability count, grade information and scan results will be displayed as follow.

Application Details
 Scan Results
When the user clicks on the open vulnerability count, the following open vulnerability list is displayed.
 Open vulnerability listing for an application
When we click on 'Show-Details', all the aliases corresponding to a particular vulnerability is displayed.
 Multiple instances open vulnerability listing
When the user clicks on the button with name of the application, it is redirected to the individual open vulnerability information page.

Individual open vulnerability information page
When the user clicks on the 'Affected Instances', the following page is displayed. It contains information regarding the affected URLs and the parameters named as the Evidence and Detail on the page.

Affected instances in the open individual information page
If a particular vulnerability has to be marked as a false positive, the user has to click on the 'Mark False Positive' button.
When the user clicks on the 'Mark False Positive' button, the following confirmation message is displayed. If the user wants to proceed, 'Yes' has to be clicked, 'No' otherwise.
 Confirmation window for marking a vulnerability as a false positive
The updated list of false positive vulnerabilities is displayed below.
 Updated false positive vulnerabilities listing
To view more information regarding the false positive, the user has to click on the button with name of the application. It is 'Test App' in this case. They will be re-directed to the individual false positive information page.
Vulnerability information for a false positive
If the user wants to mark a particular false positive vulnerability as a true positive, the 'Mark True Positive' button has to be clicked.
Once the 'Mark True Positive' button is clicked, the following confirmation box is displayed. If the user wants to proceed, they have to click on the 'Yes' button, 'No' otherwise.

Confirmation message for marking true positive
If the user wants to close a vulnerability, the 'Fix This Vulnerability' button has to be clicked.
A form with necessary description and a file supporting the evidence that the Vulnerability has been fixed should be filled and submitted.

The closed vulnerability count for an application is as displayed below.
 Closed vulnerabilities
When the user clicks on the closed vulnerability count, the closed vulnerability listing is displayed.
 Closed vulnerability list
2.4.3 Edit Application
To modify the application details such as name, target type, URL, platform type, logo and OS information, click "Update" button of the Application that is to be edited.
The current details of the application will be displayed.
Enter the changes to be made accordingly and click "Submit" to save the changes.
 Changes Entered for Application Details
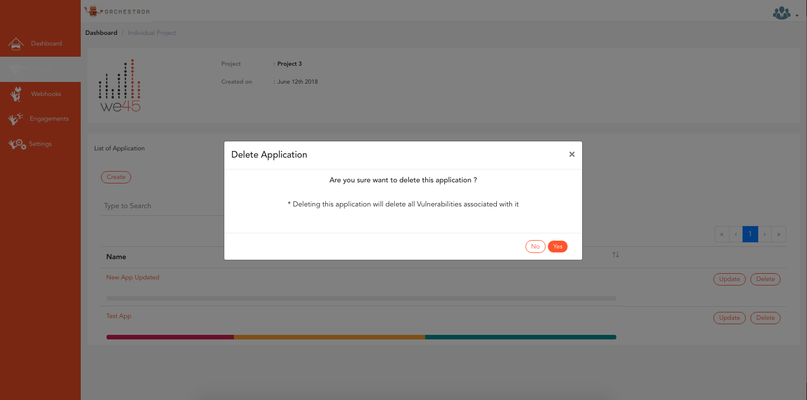
2.4.4 Delete Application
You may also delete any existing application from application listing. Click "Delete" button of the Application that is to be deleted.
The confirmation message will be prompted. Click "Yes" to proceed. Otherwise, click "No".
 Confirmation Message for Deletion
Additional confirmation to delete the application will be displayed as shown below. Enter "DELETE" and click "Delete" to confirm. Otherwise, click "Cancel".
 Additional Confirmation Message for Deletion
Upon confirmation, the application will be successfully deleted and application listing will be refreshed.
2.4.5 XML Parsing
XML results of scans on an application can be uploaded in Orchestron console. To do the same, the following steps have to be followed.
Click on the 'Upload Results' button in an application page.
On clicking the 'Upload Results' button a form is displayed. The user has to fill this and browse for the XML which has to be uploaded.
Once the form is filled appropriately, the user has to click on the 'Upload Results' button for the details of the XML files to be reflected in the application details.

Form for XML upload
2.4.6 Create Manual Scan
Scans can also be created and vulnerabilities can be added manually to it.
The user needs to click on the 'Manual Scan' button in individual application dashboard page to initiate the process of creating a scan.
Once the 'Manual Scan' button is clicked, a form is displayed. The user needs to fill the details and click on the 'Next' option.
 Manual scan
The Description and Remediation details for the Vulnerability can be provided. Once the user fills the details and click the 'Next' Option, the user can provide evidences of the vulnerability such as the URL, Parameter affected , description and an evidence file.
 Manual Scan - Description and Remediation Details
 Manual Scan - Evidence
Once the details are filled, the 'Submit' button has to be clicked for the Vulnerability to be added.
The scan created manually is reflected in the List of scans for a particular application.
2.4.7 Scan results
List of Scans are shown in individual application dashboard.
 Application dashboard
The details of scan results are as shown by clicking on the scan name.
 Scan results - details
List of vulnerabilities identified in a scan/list of vulnerabilities entered for a scan created manually are listed.
 List of vulnerabilities
Multiple vulnerabilities can be added to particular scans. This is performed by clicking on the 'Manual - Add Vulnerability' .
 Add vulnerability for scan results
The following screen is displayed when the 'Add vulnerability' icon is clicked on. The scan for which the vulnerability is to be added is mentioned in the form as shown in figure 2.68.
 Add vulnerability to a scan form (1)

Add vulnerability to a scan form (2)

Add vulnerability to a scan form (3)
Once a vulnerability (XSS) is added to a particular scan, the changes are reflected in the Scan Results.
When the name of vulnerability is clicked, individual vulnerability information is displayed.
Basic Info displays - Application, Tool, CWE, Application URL and the OWASP category
Individual vulnerability view - basic info
When the 'Affected Instances' tab is clicked, the evidence details are mentioned along with the parameters.
 Affected instances